Most LiftMaster opener troubleshooting comes down to four checks: power, the safety sensors, the remote or wall control, and whether the door itself is balanced and connected to the opener. Work through them in that order: they cover most of the “my LiftMaster stopped working” calls we get in McKinney and across Collin County, and most take minutes to check.
Below is what each symptom usually means and what you can safely test yourself. If you would rather skip straight to a diagnosis, Apex Garage Pro specializes in LiftMaster garage door repair and uses genuine LiftMaster parts on every repair.
Before You Start: Two Safety Rules
The opener only moves the door. The springs do the heavy lifting and hold a lot of stored energy, so keep two rules in mind:
- If the door looks crooked or a cable is loose or frayed, stop. Running the opener against a damaged door can bend the track or strip the opener gear.
- Never adjust springs, cables, or bottom brackets yourself. They are under high tension, and everything in this guide stays away from them.
Step 1: Check Power to the Opener
LiftMaster opener troubleshooting starts with power. If nothing happens at all, no lights, no hum, no click, the opener is probably not getting power. Check these in order:
- The outlet. Plug a lamp or phone charger into the opener’s ceiling outlet to confirm it works.
- A tripped GFCI. Garage outlets are often on a GFCI circuit whose reset button may be on another outlet in the garage, a bathroom, or outside.
- The breaker panel. Reset any breaker sitting between on and off.
- Battery backup models. A beeping or chirping battery backup usually needs a new battery.
If the outlet has power but the opener stays dark after a North Texas storm, a power surge may have damaged the logic board. That calls for a technician, not a reset.
Step 2: The Door Starts to Close, Then Reverses
This is the most common LiftMaster complaint, and the safety reversing sensors are usually the cause: the two small eyes a few inches above the floor on each side of the door. If their beam is broken, the door will not close, by design.
- Look at the sensor lights. On LiftMaster sensors the sending eye shows an amber light and the receiving eye shows a green light. Both should glow steadily. A green light that flickers or is off means the sensors are misaligned, dirty, or blocked.
- Clear and clean. Move trash cans, bikes, and leaves away from the opening and wipe both lenses with a soft dry cloth.
- Re-aim. Gently turn a bumped bracket until the green light is solid, then tighten the wing nut.
- Watch for sun glare. On west-facing garages, low afternoon sun can shine straight into the receiving eye and confuse it. If your door only refuses to close late in the day, glare is a likely suspect.
- Check the wires. Stapled, chewed, or loose sensor wires cause problems that come and go.
If the sensors check out and the door still reverses partway down, the force or travel settings or a binding track may be the cause.
Step 3: Read the Blinking Lights
LiftMaster openers use lights to tell you what is wrong, so a key part of LiftMaster opener troubleshooting is simply counting flashes. Older models typically flash the main opener lights when the safety sensors stop the door. Many newer models have a diagnostic LED, often shown as up and down arrows near the learn button, that blinks in a pattern. Count how many times the up arrow flashes, then the down arrow. That two-number code points to a specific fault, such as a sensor issue, a travel limit problem, or a motor or board error.
Your owner’s manual lists the codes for your model (the model number is on a label on the motor unit). Write the code down before you call so the technician can bring the right part.
Step 4: The Remote or Keypad Does Not Work, but the Wall Button Does
If the wall control opens the door but your remote or keypad does not, the opener itself is fine. Work through these checks:
- Check the lock feature. Many LiftMaster wall controls have a lock button that blocks remotes and keypads for security. If the light on the wall control is blinking, lock may be on. Press and hold the lock button for a couple of seconds to turn it off. Your manual shows the exact steps for your control.
- Replace the remote battery. Most LiftMaster remotes use a small coin battery. A weak battery often shows up as reduced range first, where the remote only works when you are close to the door.
- Reprogram the remote. Find the learn button on the motor unit, usually next to the antenna wire or under the light cover. Press and release it, and its light will stay on for about 30 seconds. Within that time, press and hold the remote button until the opener lights blink or you hear a click. The learn button color tells you which generation of remotes your opener accepts, and a remote has to match it.
- Check the antenna wire. The short wire on the motor unit should hang straight down. A cut or tucked-up antenna reduces range.
If none of that works, the remote or the opener’s receiver may have failed. Our garage door remote repair and keypad installation services cover both, including programming and compatibility checks.
Step 5: The Motor Runs but the Door Does Not Move
If you hear the motor humming or running but the door stays put, there are two common causes:
- The trolley is disconnected. If someone pulled the red emergency release cord, the door is no longer attached to the opener. With the door fully closed, run the opener once and the trolley will usually reconnect by itself. You can also pull the cord toward the door to reset the trolley, then run the opener.
- A stripped drive gear. Many chain-drive openers use a plastic gear that wears down over the years. When it strips, the motor spins but the chain does not move, often after weeks of grinding. Gear replacement is a common repair and often an alternative to a new opener.
Step 6: The Opener Strains, Stops, or the Door Is Heavy
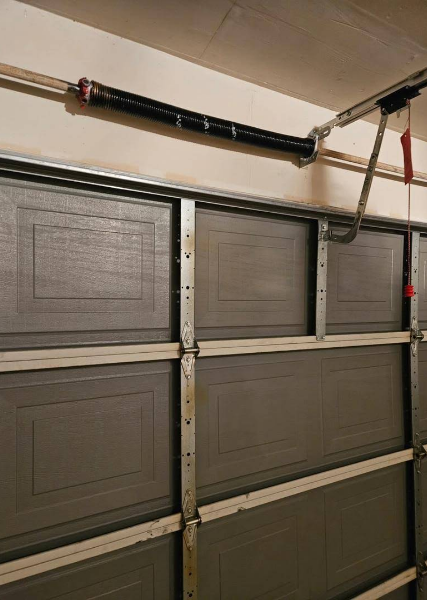
If the opener lifts the door a few inches and stops, or the door feels very heavy, the problem is usually a broken torsion spring, not the opener. Look for a gap in the spring above the door, or think back to a loud bang from the garage.
Do not keep running the opener. It is not built to lift the full weight of the door. Leave the door closed and schedule garage door spring replacement. Once the springs are fixed, the opener usually goes back to normal.
LiftMaster Opener Troubleshooting: When to Call a Pro
Some problems are not DIY fixes. Call a technician if you notice any of the following:
- A broken spring, frayed or loose cable, or a door hanging crooked
- A door that is off its track or rubbing hard against it
- Repeated reversing after you have confirmed the sensors are aligned and clean
- A dead opener with good power, especially after a storm
- Grinding, a burning smell, or smoke from the motor unit
Good LiftMaster opener troubleshooting looks at the whole system, so our technicians test the opener, sensors, wiring, springs, and track rather than one symptom. Learn more about our garage door opener repair service, or our dedicated LiftMaster repair team. Regular care also prevents a lot of opener trouble. Our annual garage door maintenance guide explains what to check each year.
Frequently Asked Questions
Why does my LiftMaster garage door go down and then back up?
The safety reversing sensors are usually the cause. Something is blocking the beam, the lenses are dirty, or the sensors are out of alignment. Check that both sensor lights glow steadily. If they do and the door still reverses, the force or travel settings or a binding track may be the problem.
How do I reset my LiftMaster garage door opener?
For a simple power reset, unplug the opener for about a minute and plug it back in. To clear all programmed remotes and keypads, press and hold the learn button until its light goes out, then reprogram the devices you use.
Why is my LiftMaster remote not working but the wall button is?
Check whether the lock feature is on at the wall control, replace the remote battery, and reprogram the remote using the learn button. If the remote still will not respond, it may be faulty or incompatible with your opener’s generation.
Is it worth repairing an older LiftMaster opener?
Often, yes. Common failures such as a stripped gear, sensors, or a remote can usually be repaired. If the opener is very old, has a damaged logic board, or lacks current safety features, replacement may make more sense. A technician can give you an honest comparison after testing it.
Get Your LiftMaster Working Again Today
If these steps did not solve the problem, or you found a broken spring, frayed cable, or an off-track door along the way, let a professional take it from here. Apex Garage Pro offers same-day garage door repair, free estimates, and emergency service around the clock for homes and businesses in McKinney and the surrounding area.
Call us today at (972) 550-6869 to schedule your LiftMaster repair.